Postgres and SQL Basics
The foundational knowledge stems from the NYU’s “CSCI-UA 479 Data Management and Analysis” course by Joe Versoza.
PostgreSQL
Installation package for MacOS: Follow this Tutorial
Postgres Object Hierarchy
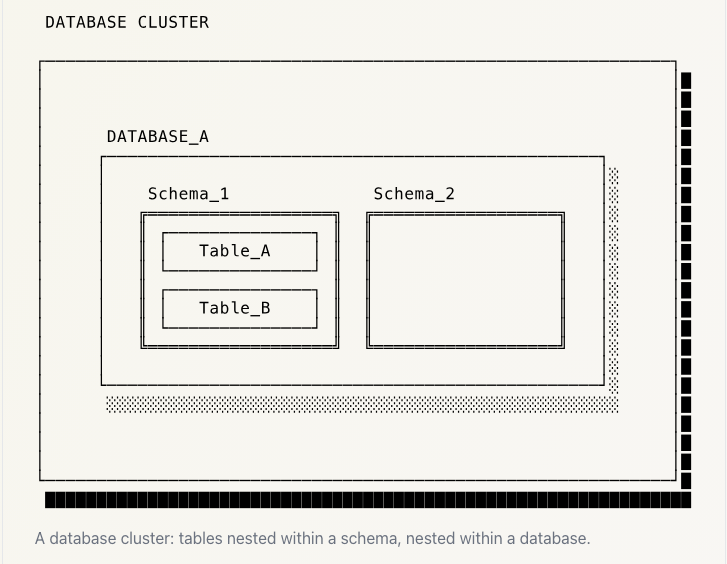
(Photos from Brandur.org)
- Templates - base template(s) to copy database from
- Databases - multiple databases allowed inon postgres instance/”cluster”
- Schemas - Groups together a set of Relations (Any other type of named Postgres object like a table, view, index, or function - name spacing). Duplicate relation names are not allowed in the same schema, but are allowed in different schemas. (Brandur.org)
- Tables - define the data structure and store the actual data values within databases (Brandur.org)
- Views - Abstraction of table / multiple tables: merge tables and perform calculations and present data as if it were a table; typically read only
PSQL
psql is command line client of postgres databases.
Commands
\l: list databases\dt: list tables\dv: list views\d: list tables and views\dn: list schemas\d table_name: discribe table\du: list users
Naming Conventions
Table names enclosed in double quotes are case-sensitive, while unquoted names are normalized to lowercase (which may not be suitable depending on your table names). To ensure consistency and best practices:
- Keep table and column names in lowercase.
- Avoid double quoting table names.
- Separate words with underscores.
- Choose descriptive names.
- Utilize underscore for foreign keys (e.g., foo_id).
- Maintain consistency in pluralization, either always using singular or plural forms.
Types
PostgreSQL offers a wide array of types, and you can even create your custom ones. These types fall into several high-level categories:
Numeric
serial(auto incrementing, pk if no “natural pk” apparent, called artificial / surrogate)integer- typical choice for integer (signed), 4 bytessmallint- 2 bytes, signedbigint- 8 bytes, signeddecimal/numeric- user specified precision numbersreal/double precision- variable-precision numbers
Strings
text- unlimited lengthvarchar(n)- wherenis num of characters (character varying)
Date and Time
timestamptz(timestamp with timezone. Stored as UTC)timestamp(no timezone)datetime
Booleans
true't'- even
'yes','y', quoted true, etc…
Other
- currency (
money) - shapes (
circle,polygon) - documents (
xml,json/jsonb) - networking (
inetfor ipv4 and ipv6,cidrfor ip ranges)
As we explore these types, the following techniques will be employed:
- Use
SELECTstatements to execute operations and functions without tables. - Utilize the
pg_typeoffunction to identify the type of a value. - Employ the syntax
value::typeto coerce a value into a specific type.
SQL Syntax
- Whitespace, including newlines and tabs, is acceptable within a statement. Therefore, formatting your code with line breaks and indentation for readability is highly encouraged.
- Statements should be concluded with a semicolon
;. - Comments commence with
--. - SQL keywords can be written in either upper or lower case, although it is common practice to use uppercase for keywords.
In the context of PostgreSQL:
- When writing SQL, names of objects are lowercase.
- Therefore, in PostgreSQL, it is advisable to avoid uppercase letters in object names to eliminate the need for quoting.
- Delimit strings with single quotes
'- use double $ as quotes
$$what's this$$ E'\t'- prefix with E to use \ as escape character
- use double $ as quotes
Creating a Database
When a database is created, it clones the template database template1.
template1can be modified so you can have a customized template (for example, add objects like languages, functions,etc.).- (there’s also
template0, which is meant to be kept as an unmodified copy oftemplate1’s initially configuration)
To create a database based off of the template template1
1
2
CREATE DATABASE some_database_name;
--uses same encoding and collation as template1
1
2
3
4
5
-- use utf8 as encoding, "copy" template0
-- instead of template1
CREATE DATABASE some_database_name
    ENCODING 'UTF8';
    TEMPLATE template0;
Additional information can be found in the CREATE DATABASE documentation.
Creating a Table
CREATE TABLE <table_name> (
- comma seperated list of column names and their type seperated by space
- can specify some constraints after type, such as:
NOT NULLUNIQUEPRIMARY KEY
- default value specified with:
DEFAULT value_to_default_to
)
1
2
3
4
5
CREATE TABLE <table_name> (
  <column1_name> <type1> <constraints_if_any>,
  <column2_name> <type2> <constraints_if_any>,
  ...
);
Create a student table with 5 fields: netid first, last, midterm and registered
1
2
3
4
5
6
7
CREATE TABLE student(
	 netid varchar(20) PRIMARY KEY,
	 first varchar(255) NOT NULL,
	 last varchar(255) NOT NULL,
	 midterm numeric,
	 registered timestamptz DEFAULT NOW()
);
Additional information can be found in the CREATE TABLE documentation.
Create (INSERT)
To add a new row to a table, use an INSERT statement
1
2
3
4
-- values in order of field names (registered
-- left out, as it has a default value)
INSERT INTO student
	VALUES ('fb123', 'foo', 'bar', 90);
1
2
3
4
5
-- specify columns and matching values (does not have
-- to follow same order of columns in CREATE TABLE)
INSERT INTO student
	(first, last, midterm, netid)
	VALUES ('baz', 'qux', 70, 'bq789');
Additional information can be found in the CREATE INSERT documentation.
Read (SELECT)
Use a SELECT statement to read data:
- Begin with
SELECT, followed by a comma-separated list of columns or calculated values you wish to display. - Optionally, use the keyword
FROM tablenameto specify the table for the query. - Optionally, include
WHERE condto define conditions for filtering rows. - Optionally, employ
ORDER BYto specify the sorting order. - Optionally, use
LIMIT numto restrict the number of returned rows.
Additionally, you can combine query results using UNION and INTERSECT.
The select list may consist of:
- Column names
AS some_aliasfor renaming column names or naming calculations*means all columns- Operations, functions, or expressions
DISTINCTfor retrieving only unique rowsDISTINCT ON (expression)for the first row matching the expression (ensure you order by the expression to avoid unpredictable results).”
1
2
3
4
5
6
7
8
9
10
11
12
13
14
15
16
17
-- give me col1, col2, and new_col only
-- new_col is a calculated field
-- this is the 'SELECT list'
SELECT col1, col2, col3 * 2 as new_col

	-- from table, some_Table
	FROM some_table

	-- the value in col1 must be > 1
	-- for the row to be returned
	WHERE col1 > 1

	-- sort by col2 ascending
	ORDER BY col2

	-- only give back, at most, 5 rows
	LIMIT 5;
SELECT retrieves rows from zero or more tables.
The processing order of the parts of a SELECT query is as follows:
FROM: Determines the set of all possible rows to be returned.WHERE: Filters out rows that do not match the specified criteria.SELECT list: Determines the actual values of the resulting rows by evaluating expressions, resolving column names, etc.DISTINCT: Eliminates duplicate rows in the output (orDISTINCT ON).ORDER BY: Sorts the output rows.LIMIT: Restricts the output rows to a specific number.
Additional information can be found in the SELECT documentation.
Operators
- arithmetic:
+,-,*,/ - string concatenation:
||('HI' || 'THERE') - logical operators:
AND,OR,NOT - check for NULL:
IS NULLandIS NOT NULL - pattern matching, case sensitive and insensitive:
LIKE,ILIKE
Functions
NOW()(current date / time),ROUND(val), etc.
Additional information can be found in the Functions and Operators documentation.
SELECT examples
1
2
-- get all students
SELECT * from student;
1
2
-- get all students, just netid, first, and alias first as fn
SELECT netid, first AS fn FROM student;
1
2
-- get all students, show netid and midterm grade divided by 100
SELECT netid, midterm / 100 FROM student;
SELECT + DISTINCT
This shows the distinct rows (remove duplicate rows)
1
2
-- show the distinct first names of students
SELECT DISTINCT first FROM student;
SELECT + WHERE
Optionally, add a WHERE clause to specify conditions (think filtering)
- conditions can use operators like
=,<>(not equal),>,< - you can also use
LIKEandILIKEwith%representing wildcards to match on substrings (ILIKEis case insensitive) - use
col_name IS NULLto check for aNULLvalue - multiple conditions can be put together with
AND,OR,NOT - parentheses can be added to specify precedence
SELECT + WHERE examples
1
2
-- only students with midterm > 80
SELECT * FROM student WHERE midterm > 80;
1
2
3
4
5
-- only students with between 70 and 70
SELECT * FROM student
	WHERE midterm > 70
	AND midterm < 90;
-- can be done with BETWEEN 71 and 89
1
2
3
4
5
6
7
-- students that have no midterm score
SELECT * FROM student WHERE midterm IS NULL;
-- get the netid and first name of students with taht have a netid
-- that has jv in it or start with Jo, case insensitive
SELECT netid, first FROM student
	WHERE netid LIKE '%jv%'
	OR first ILIKE 'Jo%'
Ordering
Add an ORDER BY clause at the end of SELECT to specify ascending ordering
1
2
3
SELECT * FROM student
	WHERE midterm < 60
	ORDER BY registered;
Add DESC to order tin descending order
1
2
SELECT netid FROM student
	ORDER BY registered DESC;
Seperate multiple column names to order by multiple columns
1
SELECT * FROM student ORDER BY last, first;
LIMIT
LIMIT clause can be added at the end of a SELECT statement (after ORDER BY) to contrain the number of results of the query
Only show 10 results
1
2
3
4
SELECT netid, first, last
	FROM student
	ORDER BY netid
	LIMIT 10;
DISTINCT ON
Show the highest score per student first name
1
2
3
SELECT DISTINCT ON (first) netid, first, midterm
	FROM student
	ORDER BY first, midterm DESC;
Update (UPDATE)
Use an UPDATE statement to set the value of a column for a row/rows
- Begin with the keyword
UPDATE. - Specify the name of the table to be updated.
- Follow this with the keyword
SET. - Finally,
column_name = some value.
1
2
-- set all students' registered field to 1/1/2024
UPDATE student SET registered = '2024-01-01';
Add WHERE clause to UPDATE(after SET) to specify which rows to chage
1
2
3
4
-- only set midterm score for rows that have netid fb123
UPDATE student
	SET midterm = 80
	WHERE netid = 'fb123';
Additional information can be found in the UPDATE documentation.
Delete / Remove Rows (DELETE)
Use DELETE statement to remove rows from a table
1
DELETE FROM student WHERE midterm > 90;
Add / Remove Column (ALTER)
Use ULTER TABLE to add / remove columns
1
2
3
-- add a new column
ALTER TABLE student
	ADD COLUMN final_exam_score integer;
1
2
3
-- add a new column with a default value
ALTER TABLE student
	ADD COLUMN final_exam_score numeric DEFAULT 80;
1
2
-- remove a column
ALTER TABLE student DROP COLUMN final_exam_score;
ALTER TABLE can also be used to modify columns
1
2
3
4
-- change data type of column
ALTER TABLE student
	ALTER COLUMN netid
	SET DATA TYPE varchar(200);
1
2
3
-- rename column
ALTER TABLE student
	RENAME COLUMN midterm TO midterm_score;
Additional information can be found in the DELETE documentation.
Casting
We can use either of the two expression to cast a value from one type to another
CAST (columnname AS newType)val::newType
1
2
3
SELECT netid,
	CAST (midterm AS smallint) AS smol_mid
	FROM student;
1
2
3
-- assume that midterm is integer
-- cast to numeric
SELECT * FROM student ORDER BY ROUND(midterm::numeric, 2);
Formatting (ROUND)
ROUND rounds a numeric value to a specified number of decimal places
1
2
3
4
-- assuming midterm is now a integer
-- cast to numeric
-- so that we can round to two places
SELECT netid, ROUND(CAST(midterm AS numeric),2) FROM student;
Removing tables / Databases (DROP)
Use the DROP command to remove databases or table
DROP TABLE table_name;DROP DATABASE database_name;
Usage notes:
- Ensure you connect to another database if you intend to drop the currently connected database.
- Use
IF EXISTSto prevent errors if the table being dropped does not exist.DROP TABLE IF EXISTS table_name;